Construction of external stairs
A staircase is a timeless, beautiful but challenging product. It is always made for its user. The intended use of the staircase must be taken into account in the design. The instructions and regulations of the Building Regulations must be followed when manufacturing the staircase. By following the given regulations and proven practices, a safe and durable whole is produced.
To ensure that the above challenges are met in a staircase project, sufficient space must be reserved for the staircase already in the design phase. The structure of the external staircase must be designed so that water and moisture cannot accumulate in the gaps and the water can drain away easily.
Before laying the foundations, it is a good idea to find out the frost depth of the construction site. More information on frost depth by region can be found on the Environmental Administration’s online service .
Design
When building outdoor stairs, it is recommended to use pressure-treated and/or heat-treated wood, which provides longer-term protection against weather changes and rot than regular wood. Pressure-treated and heat-treated wood is recommended when the site is constantly exposed to weather stress. Class A pressure-treated wood is best suited for direct ground contact. Pressure-treated and heat-treated wood can be combined in stair structures.
It is advisable to use unplaned timber for outdoor stairs, as this reduces the slippery nature of the surface. For indoor stairs, use well-dried, high-quality timber. If the moisture content of the timber is too high, it may warp and crack when dried at room temperature.
Use only stainless steel fasteners. All dimensions are in millimeters unless otherwise stated. Dimensions are examples. Feel free to substitute with available lumber.
The structure of the external stairs should be designed so that water and moisture cannot accumulate in the gaps and that the water can drain away easily. For example, cardboard insulation can be placed between the floor joists and boards.
Wood oils, transparent and opaque wood preservatives and paints intended for outdoor use are suitable for surface treatment of wooden stairs. Mold growth can be prevented by treating the surface with a mold inhibitor. The air, paint and surface to be painted must be at least + 5 °C and the relative humidity of the air must be below 80% during surface treatment and drying. The surface treatment agent must be selected according to the intended use. Read the surface treatment agent manufacturer’s instructions before treatment. When treating pressure-treated wood, it is important to ensure that the wood to be treated is sufficiently dry. An outdoor staircase built in the spring is sufficiently dry to be surface treated in late summer. If the construction work is scheduled for summer or autumn, it is advisable to carry out surface treatment only the following summer. It is recommended that heat-treated wood surfaces be surface treated immediately upon installation. When treating surfaces, special attention should be paid to the treatment of cut surfaces, because wood naturally absorbs moisture most from the ends of the piece in the longitudinal direction. If the products are treated before installation, the attachment points must be protected separately with a surface treatment agent after installation.
The height of the stair railings is 900 mm from the step surface to the wall. High external stairs can also be built to end on the short side of the upper level.
Stairs outside
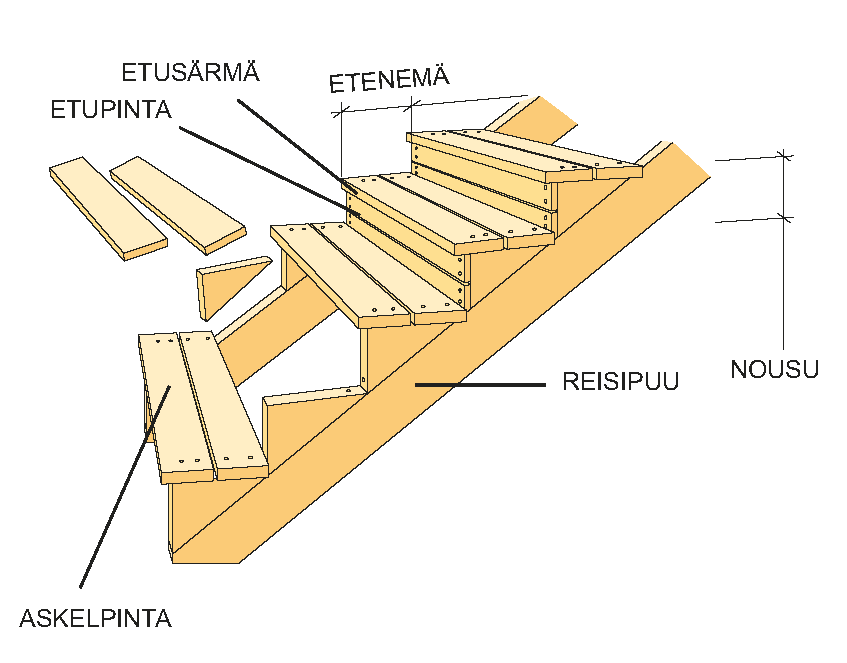
The sides of the stairs are called the stringers and the top of the stairs is called the tread. The difference in height between the steps is called the rise. The horizontal distance between the leading edges of two consecutive steps is called the tread.
Below are the requirements for external stair risers and treads according to RakMk F2.
- Covered or heated outdoor stairs: rise ≤ 160 mm, tread ≥ 300 mm
- Uncovered external staircase: rise ≤ 130 mm, tread ≥ 390 mm
The rise angle of stairs used outdoors should be gentler than that of indoor stairs. The rise angle of an outdoor stair can be 18°–23°, while in covered areas the stair can be steeper, 20°–28°. To avoid water and ice accumulating on the front surface of the step, the surface can be made gently sloping (1:50, approximately 1.2°).
The stringers of the stairs are made of 45 mm thick timber. The tread can consist of one piece glued together or two separate parts with a thickness of 28, 34 or 45 mm. The dimensions depend on the width of the stairs and their intended use.
Recessed steps
Make grooves in the stringers where the steps will fit snugly. The grooves will be covered when the front edges of the steps are built to extend over the stringers. Mark the positions and thickness of the steps using a square, a bevel and a sharp pencil. The grooves in the stringers are sawn and sanded. If you are using a hand router or circular saw, move the machine carefully along the slats secured with nails or clamps.
Use carpenter’s glue or moisture-resistant glue suitable for outdoor use for assembly. The structure is assembled so that there are two glue presses for each step. Long screws can be screwed into the inside of the step from the outer edge of the stringers for reinforcement. In outdoor use, the stairs will stay together well when a 10 mm thick threaded rod, washers and nuts are used in the structure. Threaded rods can be purchased from a hardware or lumber store.
High exterior stairs
The five posts of the structure are supported by concrete-cast foundation pillars (1). For solid soil, 500–700 mm deep support pits are sufficient, otherwise the pits should be extended below the frost line. First, pour a concrete base plate into the pit. A straight reinforcing bar is pressed into the middle of the plate. After the casting has hardened, a 150 mm casting formwork is placed in the pit and the pit is filled with soil around it. The formwork is then filled with concrete, and strong plate fasteners (size 6 x 40) are attached to the pillars during the casting process.
The posts (2) are made of two pieces (size 45 x 95) that are nailed together. Completely solid posts are prone to cracking.
For horizontal beams (3) (45 x 70-95) and (4) (45 x 195), suitable grooves are made in posts (2) and (3). At the corners where two beams meet, a corner joint A is made. The posts are attached to the foundation pillars.
The support board (6) (45 x 145) is screwed directly to the wall of the house. The post (5) is made of 45 x 95 timber and screwed to the outer wall.
The rear floor beams (6) (45 x 145) are supported on the support board. They are attached to the front side using beam shoes and anchor nails or screws.
The beams (3) form the frame for the railing boards. A strong beam (4) connects the posts and forms the outer edge of the deck planking. The floor, which will be level with the upper edge of beam (4), is built from floorboards measuring 22–28 x 95.
The railing continues along the sides of the stairs to the post. The railing beams are placed in the notches made in the post and nailed diagonally. The stringers (8) of the stairs are 45 x 195–220. Each tread (9) consists of two or more pieces (28 x 95 – 145). When there is a 10 mm space between the pieces, the tread has a total rise of 400 mm. The tread is supported by small brackets (34 x 45), which are glued and screwed to the inner surface of the stringers. The tread is nailed diagonally or screwed to the top or side through the stringers. In the latter case, thin screws are used that are sunk deep into the wood. The remaining hole is filled again to make the side smooth and pleasant to look at.
The upper part of the stairs is attached to the beam (4) using beam shoes. The lower part of the stairs can be supported by two concrete slabs.
The railing boards are quite narrow, approx. 28–34 x 45–70, with a 15 mm gap between them. The underside of the boards is sawn at an angle to allow water to drain away better (so-called drip edge). The boards extend a few centimetres below the side beam (4) and the stringers (8). Alternatively, the boards can also be cut slightly higher. Experiment to see which option suits your house best.
Finally, a board, size 28–34 x 95, is nailed horizontally onto the railing. The top is planed to promote water drainage. Protective boards, size 45 x 145 x 145, are nailed to the ends of the posts. They are also shaped so that water does not collect on them.
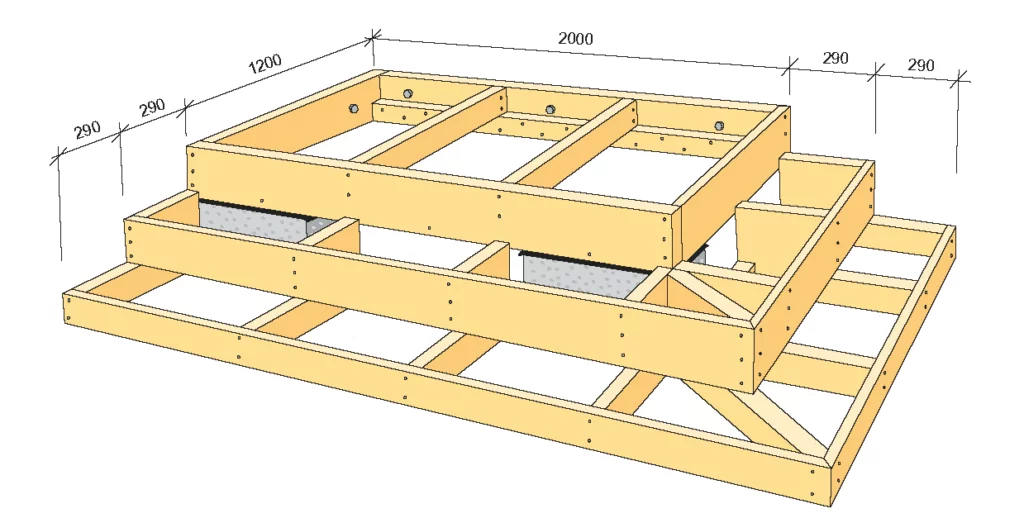
Low external stairs
The stairs are built directly into the ground, so the foundation must be well drained and leveled. Concrete slabs can be used as supports at suitable points.
The rear side (10) and the side 45 x 195 are screwed to the house foundation. Use plastic screw plugs or wall plugs drilled into the wall. The beams (11) (45 x 70) are nailed to the rear of the section (10) and supported at the front on two concrete blocks (12) with a height of 190. The blocks support the floor beams (13), which are sawn to size 50 x 125. Depending on the thickness of the wooden structures, the floor beams can be placed closely or less frequently. The front beam (11) is fixed to the concrete block with screws or angle brackets. Place an insulation strip between the wood and the concrete block. Cover boards, size 45 x 195, are nailed to the front side and the remaining short side.
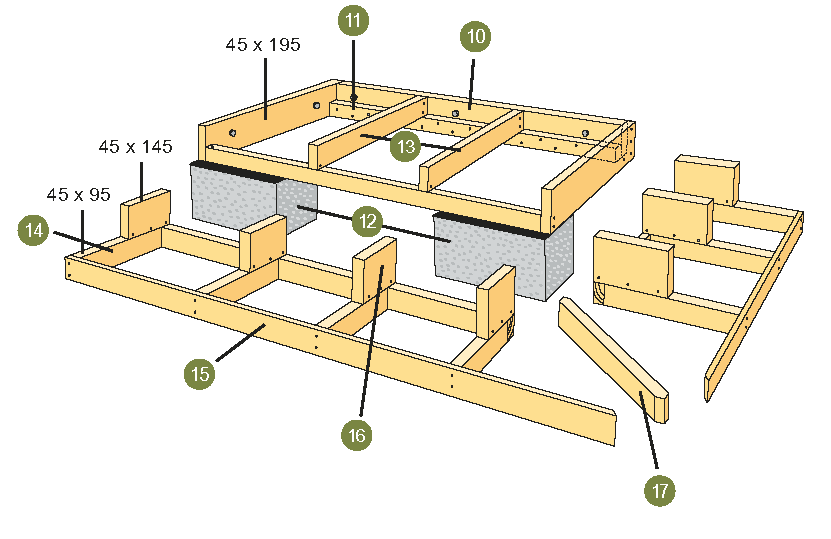
The lowest step is lower than the other steps. The base (14) is 45 x 95. The front (15) is 22 x 95. The rear part (14) is screwed to the concrete block (12). A support beam (17), 45 x 95, is placed in the corner. Each step surface consists of deck boards with a width of 95 – 145.
Leave a 5 mm gap between the boards. Use 5 mm measuring blocks as an aid. The front board should extend 10 mm beyond the front surface of the step, creating a drip edge.
The sections (16) (45 x 145) are nailed diagonally. They should extend 50 mm along the front of the upper level. They are also nailed diagonally. A board measuring 22 x 145 is used to cover the middle step.
Align and check the stair parts using a spirit level and a square. Use stainless screws 125–4.0, 100–3.4 and 75–2.8 for the frame. Use stainless steel nails (75–3.1) or screws 55–75 long to attach the boards. Drill holes in the ends of the boards before nailing them so that the nails do not split them. When the thickness of the boards used is 28, the height of the first step will be 123 and the height of the others will be 145.